
Reuse of improvised materials helps to solve important tasks for the gardener. Folk craftsmen skillfully use wooden pallets, logs and plastic bottles to create raised vegetable beds, garden paths, wallpaper, and even country furniture. In this article, we will look at ideas and methods that will help you create a landscape design from improvised materials and old objects. You will learn how to easily and effectively transform an ordinary garden into an attractive and functional landscape.
Ideas for creating garden paths
A well-planned system of garden paths simplifies movement around the country plot and gives it a more attractive appearance. The main thing is not to forget about matching the style. For landscape (irregular) styles of landscape design, paths should be winding, while for regular styles, they should be straight. The first group includes English, country, cottage, Russian, Japanese and Chinese styles. And to the second — French, Mediterranean and minimalism.
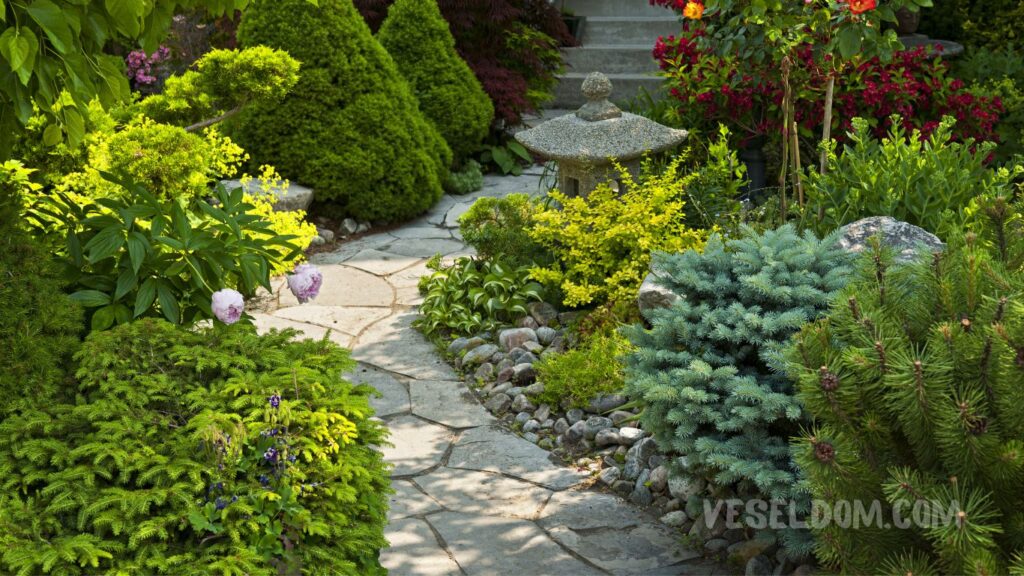
Importantly! The minimum width of the garden path is 0.5 m, so that two people can comfortably move along it, it is necessary to count on a width of 0.8 m.
The main methods of creating garden alleys include:
- Gravel path. It is one of the simplest. You don’t even have to dig deep – only 15 cm, after which you need to compact the bottom, install borders and cover with gravel.
- Brick path. This option is a little more complicated, but possible without the use of concrete. To create it, you will need bricks and geotextile. It is necessary to dig a ditch, then compact the bottom and lay one layer of geotextile (this prevents the growth of weeds), and on top of that place brick tiles in rows. So that the laying does not look primitive, you can lay bricks in the form of a herringbone or at an angle. Do not use polyethylene film for the path, because geotextile not only does not allow water to stagnate, but also allows it to pass into the soil, which polyethylene cannot do.
- Mixed track. This option can be obtained by combining two materials, for example, concrete cast tiles and around them a loose gravel.
To create concrete tiles for the path, you need:
- Stock up on forms that you can buy in a store or make yourself from boards in the form of rectangular boxes. To ensure the evenness of the tiles, draw a line on the inside of the form to which the mortar will pour.
- Prepare construction concrete by mixing 1 part cement, 3 parts sand and 5 parts crushed stone. First, mix the dry ingredients and add water gradually to get a paste-like consistency.
- Pour the mixture into molds and distribute the pebbles on the surface in the form of a pattern. It should hit the concrete.
- Wait 24 hours and then remove the tiles from the molds.
Those who have a lot of cobblestones, PET bottles or other recyclable materials can use them. Cobblestones can be fixed on a concrete base, and only the bottoms of PET bottles can be used, which are also fixed in concrete.
It is important to remember that there may be a limited number of such materials, and they may not be enough for all paths, except in cases where the cottage can be divided into visibly separated functional zones. It is also important that these zones are connected into a single image using the same patterns, textures or colors. This will contribute to the creation of a harmonious and aesthetic landscape on your summer cottage.
In addition, we will consider other interesting options for creating garden paths. For example, you can use old stones or paving stones, which will create a special character of the garden. Another idea is to use wooden boards or rails to create a natural and environmentally friendly alley.
Do not forget about plants when designing garden paths. An excellent option is to frame paths with hedges, which will create coziness and add green color to your garden. Also, consider planting flowering shrubs or decorative flowers next to the paths, which will give them sophistication and color.
Creating garden paths using materials at hand is an exciting process that will allow you to express your creativity and give your garden a unique character. Regardless of the chosen method, remember the main thing – it is important that garden paths are not only beautiful, but also functional, facilitate comfortable movement and add charm to your garden.
Do-it-yourself design of fences and curbs
Fence and curbs are key elements of landscape design. This is the first thing a guest sees, so they should be built from high-quality materials:
- Wood – edged boards for fences (which can be not only wooden, but also metal), vines or branches (especially when you create a fence in a rustic style).
- Metal sheets fit perfectly into the classic style.
- A metal profile is often used in the Art Nouveau style.
- Bricks and concrete sections are also reliable materials for fences and curbs.
Concrete fences, like brick fences, show excellent resistance to sudden temperature changes and adverse weather conditions, which makes them a popular choice for decorating your garden. Despite the fact that they can be difficult to adjust to a specific style, they always look spectacular.

Did you know that the most expensive fence in the world was built around the mansion of Turkish businessman Mehmet Ali Gokceglu in the city of Izmir? This construction is an aquarium with sea creatures and cost 21 thousand dollars.
Handy materials are often used when creating fences and borders for flower beds and flower beds, they play a decorative and practical role. Thanks to them, the territory looks more well-groomed, and the beds are protected from pets.
You can purchase and install the following options:
- Plastic curbs are affordable constructions of various shapes and colors. They consist of separate sections and are easily installed in the ground with the help of pointed legs.
- Wrought metal fences look great in any composition and are suitable for open front gardens and flower gardens.
You can also make borders with your own hands. For raised beds, a fence made of wood is often chosen, which helps to retain the soil and does not deform during operation. It can be in the form of rectangular or square boxes made of boards.
Plastic bottles are an affordable material for any gardener. It is enough to choose bottles of the same shape and size, fill them with pebbles or sand, close the lids and dig in with the necks down. If there are not enough bottles of the same color, the finished fence can be painted. A similar design can be created from glass bottles.
A fence made of driftwood looks unusual, but it is easy to create. Find several dry thick branches or trunks, remove the bark from them, treat them with bitumen mastic against rotting and install them along the perimeter of the flower bed by digging a trench.
Wicker fences are great for rustic or country styles. Use wooden pegs and fresh willow twigs for weaving. So that the branches do not fall off, their ends can be fixed with shoe nails. This creates an interesting and original look for your garden.
As for brick fences , you can consider creating them according to the following scheme: first prepare a trench 5-10 cm deep, then put a geotextile on the bottom, and install bricks on it. Then you can fill the void left with soil. Another option is to use natural stones , as they are found almost everywhere: on the road, near the river and in the forest.
Garden fences and borders created using materials at hand can express your uniqueness and creative approach to landscape design. They give your garden and garden more individuality and special character. This approach allows you to create your own unique image and meet your aesthetic and practical needs.
Remember that when creating fences and borders, it is important to choose materials that match your style, as well as take into account the functionality and practicality of these structures. Designing fences and borders with your own hands can be an exciting process that will add a special charm and character to your garden landscape.
Decoration of the area with flower arches
An arch is a structure consisting of two supporting posts and an upper ceiling made in the shape of an arc. It not only adds beauty to your area, but also marks the transition to a separate area or defines the path to a place of rest. In modern garden design, arches can be used as part of a swing or as a canopy over a seating area.

Arches can be made of various materials, such as forged metal or wooden structures joined at the top. A very simple model can be made from a metal rod, connecting it by welding. To ensure stability, metal legs can be attached to the structure and dug into the ground.
Wood is more difficult to bend, so the arch is often made of individual wooden elements. A wooden beam is cut into the necessary pieces, folded into an arc-shaped structure, which is fixed to the side posts. After assembly, the wood is treated with a special antifungal composition and covered with varnish or paint.
It is important to remember! If the arch will stand in the garden permanently, it is better to use strong materials and install the racks in concrete so that they are not deformed under the influence of temperature changes. Thus, your flower arch will be not only a beautiful decoration, but also a long-lasting structure that will delight you for many seasons.
Garden sculptures
Most modern garden sculptures are made of concrete . This material is very plastic and allows you to make a variety of works of art. With the help of concrete, you can create:
- Garden furniture that adds comfort and style to your garden. They can include benches, tables, chairs and other elements.
- Paths that allow you to create paths and paths that connect different parts of the garden.
- Gazebo or patio steps and decking that add comfort and style to your garden space.
- Flower pots of various sizes and shapes that allow you to grow and decorate plants.
- Original flower beds in the shape of animals , which create interesting accents in the garden.
- Fountains and ponds that add sound and movement to your garden landscape.

Working with concrete usually requires only a few components:
- M500 concrete.
- Filler, which can be sand, gravel or crushed stone.
- Water.
The components are usually mixed in a ratio of 1:3:5 (cement, sand, crushed stone). For a high-quality solution, dry components are added to the container in layers, mixed until homogeneous and water is added. The amount of water depends on the consistency – the solution can be more sticky or liquid depending on the amount of water. We remind you that the more water there is in the solution, the longer it will take to dry.
One of the easiest ways to make concrete products is sand casting. For example, to make a statuette, you need the following:
- Two containers larger than your figurine.
- Ready concrete solution.
- Sand.
- Polyethylene.
- Machine oil.
- Volumetric statuette.
Step-by-step instructions:
- Pour sand into the containers and moisten them abundantly with water.
- Immerse the statuette with the front part in one container, and then with the back side in another. In both cases, deepen it by half.
- A form came out in the sand, according to which the object will be created.
- Then place polyethylene lubricated with used machine oil on it and pour the solution.
- After a day, it will harden, and the halves of the product can be removed from the sand and connected with concrete.
- If necessary, the product can be painted and decorated with pebbles or other decorative stones.
Leaves are a popular garden decoration made of concrete . They are used to decorate gravel alleys, create garden fountains or feeders for wild birds.
To create concrete sheets, you will need the following materials:
- Plastic containers.
- Large leaves with deep veins, such as hosta or rhubarb.
- Cement.
- Sand.
- Green paint and brushes.
Step-by-step instructions:
- Take leaves with deep veins in the garden.
- Pour sand into the container and moisten it with water.
- Press the sheet against the surface of the sand.
- Mix a thick paste-like concrete solution (portland cement can be used to make the leaves stronger).
- Pour this solution on the sheet. The thickness of the poured solution should be approximately 3 cm. Distribute the mixture with gloved hands so that there are no cavities under it.
- Leave for 24 hours to harden.
- Then remove the workpiece. The roughness of the surface can be cleaned with sandpaper and painted with paints.
These concrete sculptures can become great accents in your garden and give it an individual style. With their help, you can create unique compositions and decorations for your green area. Concrete sculptures are reliable and weather-resistant, making them an ideal choice for a garden or yard.
Flower beds and flower gardens
Flower beds and flower beds are an important part of garden landscape design, and there are many varieties of them. They are classified according to various characteristics, such as size, shape, type of cultivated plants and stylistic features.
Usually, flower gardens are located on the site, similar to vegetable beds. However, designers suggest using vertical spaces effectively.

You can create a hanging structure from a wooden pallet to decorate the wall of an old barn. This design can be used to grow herbs, strawberries, or annual flowers. At home, from the same pallet, you can create a rack for storing tools or garden furniture.
It is important to make sure that the weight of the fully filled pallet after watering can be securely supported in the location you have chosen.
To create a wall flower horizon from pallets, you need the following materials:
- Pallets.
- 4 mounting brackets.
- Nails.
- Drill.
- Landscape geotextile.
- A thin sheet of plywood to cover the back wall of the structure.
- Garden soil.
Not all pallets are created equal and vary in shape, size and wood quality. It’s important to choose pallets that are in good condition and made from solid wood.
Step-by-step instructions for creating a flower horizon from pallets:
- Clean the pallet by removing the extra protruding nails and smooth the roughness with sandpaper.
- Mark the place on the wall where the pallet will be fixed. Use a level to check the correct alignment and make appropriate marks. Then install the L-braces on the wall and mark the places on the pallet where they will be inserted.
- The back wall of the pallet should be covered with geotextile. Fasten it with staples using a construction stapler, and place a sheet of plywood on top of it.
- Close the bottom of the structure in the same way. Make sure that the soil does not wake up through the coating. If the holes on the front wall are large, fix the geotextile inside and simply cut holes for the plants in it.
- Fill the structure with soil and make sure that it holds securely.
- Fix the structure on the brackets, plant the plants and water them from the sprayer.
Another simple way to create flower horizons is to use plastic bottles. For this, you will need empty bottles that can be used to create unique compositions.
Plastic bottles are cut on one side, then fastened together with construction cord. According to this scheme, a panel of bottles is created. This structure can be fixed on the wall using brackets and grow spices or annual flowers in it, which will add bright colors to your garden.
From the stump
If you have an old stump in the garden, you can use it to create interesting decorative elements and functional structures. Here’s how you can do it:
Flower garden:
- Using an old stump, you can create a wonderful flower pot. To do this, you need to hollow out the trunk of the stump from the inside, creating a cavity.
- Make drainage holes in the bottom of the cavity and treat the surface with a sealing solution to prevent the wood from decaying under the influence of moisture.
- Add a drainage layer to the bottom of the cavity, and then fill it with nutrient soil.
- Plant the appropriate flowers and plants in this flower garden. It will become an interesting decoration of your garden.

Step-by-step instructions for creating a flower bed from a stump:
- Uproot the old stump and cut off the rotten parts.
- Level the surface of the stump with an ax, discarding irregularities.
- Using a drill, make holes in a circle on the stump, placing them at a distance of at least 7 cm from the edge to avoid splitting the structure.
- Using a hammer and chisel, separate the pieces of wood, creating a cavity.
- Drill angled holes that connect the cavity to the outer edge of the stump.
- Treat sharp edges with tar to prevent wood rot.
- At the bottom of the cavity lay a drainage layer, such as pebbles, expanded clay or foam.
- Add fertile soil to the cavity and plant various flowers such as marigolds, petunias, garden creeper, sweet peas.
- After planting the plants, be sure to water them.
With these steps, you can turn an old tree stump into an attractive flower pot that will add a unique charm to your garden.
From the log
Wood from sawn trees can be used in the manufacture of various useful and decorative products. Here are some ideas:
- Garden furniture: You can create garden furniture such as chairs, benches and table using log. Wooden furniture will add authentic charm and comfort to your garden.
- Playground Sports Deck: A deck can be turned into a playground sports item, such as a balance deck. Children will be grateful for this interesting swing.
- Decorative mushrooms: Dress up the deck with hats made from old bowls or other materials, and you will have a group of decorative mushrooms to decorate the garden.
- Raised Bed Fencing: Use a log as a fence for your raised beds. It looks natural and stable.
- Walkway blocks: Cut a log into thin blocks that can be used to line an alley or garden path.
- Flower garden: Create an original flower garden using part of the deck. Remove the central part, cut holes for drainage, polish and finish with bituminous mastic to protect against moisture. After that, add soil and plant the plants.
- Insect habitat: An old tree stump can serve as a habitat for insects such as snails. It will attract them and early in the morning you can collect them for further removal.
- Home for wasps and bees: Use branches or parts of logs with holes as a home for wasps and bees to help attract beneficial insects to your garden.
Importantly! Note that trees that do not grow in the ground may suffer from pests because they do not release as many phenols to repel insects. When planting plants in such structures, measures should be taken to protect against pests, as well as when planting in the ground.
From pallets
Wooden pallets will easily turn into:
- Garden furniture (tables, stools, deck chairs): Use wooden pallets to create a variety of garden furniture, such as tables, stools, and deck chairs. They are lightweight, modular and unique, and easy to build.
- Flower Pots: Pallets can be turned into flower pots, ideal for growing a variety of plants. Polish the surface of the pallets and turn them into original containers for flowers.
- Garden bed: Build a garden bed by stacking several pallets together. They will allow you to easily grow vegetables and other plants in a convenient way.
- Garden Tool Rack: Use pallets to create a rack for storing garden tools like shovels, rakes and pots.
- Fence in the front garden: Cut pallets into blocks and use them to create a fence in the front garden. This will add structure to your garden and protect it from unwanted guests.
- Garden Paths: Cut pallets into strips and use them to create garden paths. This will add structure and lightness to the garden design.
- Bike rack: Make a bike rack by stacking several pallets together. It will help you keep your bikes in order and save space.
- Shoe rack: Use pallets to create a shoe rack in the garden or on the porch. It will help keep shoes clean and organized.
- Compost Box: Turn pallets into compost boxes where you can grow your own compost for the garden. It will be a useful ecological solution for your garden.

To create furniture from pallets, follow the following instructions:
- Sand the surface of the pallets to remove roughness and unevenness.
- Fasten the four pallets together with screws along the long side. Add a fifth pallet on top to create a bar.
- Put one pallet on the floor and attach the second one to it so that the letter “H” comes out. Make sure the long part of “G” lies on the floor – and the chair is ready.
- Put two armchairs together and add a couple of decorative cushions to the backs and you have a garden sofa.
- Fasten two garden sofas at a 90 degree angle to each other and your kitchen corner is ready for use.
- To keep the furniture in good condition and to protect the wood from moisture, it is recommended to paint it.
Creating garden furniture from pallets is an affordable and creative way to furnish your garden or veranda. You can add your own style and use them for lounging, alfresco dining and many other tasks.
From cement and stone
Cement is widely used for construction as well as for landscape design. With its help, they create:
- Garden paths : Cement paths can serve a practical and decorative function in the garden. They add structure and easily support the garden landscape.
- Slope Retaining Walls : Cement retaining walls are used to support slopes and accommodate plants. They preserve the structure of the garden and prevent the soil from collapsing.
- Patio Flooring : A cement floor or patio cover can add a modern and stylish look to an outdoor seating area.
- Decorative sculptures and pots for the garden : Using cement, you can create impressive decorative sculptures and pots that add an artistic element to your garden.
- Garden furniture or its individual elements : Cement blocks and structures can be used to create garden furniture such as tables, stools, as well as other elements that add comfort and style to your garden.
- Fountains : Cement fountains can be a great addition to your garden, creating a relaxing atmosphere and a water source that attracts birds and adds harmony to the landscape.
Now let’s consider the details of creating openwork vases and bowls for relaxation from cement:
For openwork vases :
- Dip the cloth in the cement solution and place it on the can so that it forms nice folds.
- Put this product on a jar and leave it until it hardens. As a result, you will get a beautiful vase with curved walls.
Another creative way to create a vase is to dip an old vase, attached to cotton threads, in cement mortar, and then dry it by putting it on an old ball. It will be an openwork vase for flowers.
For relaxation bowls :
- You will need a spherical bowl, a can, concrete mortar and gloves.
- Mix a concrete solution of 1 part cement and 3 parts sand in a container.
- Before pouring this solution, place the film in a larger bowl and then pour some of the solution.
- Place a can on this solution, and if it is too light, pour some crushed stone on the bottom.
- After 6 minutes, turn the can from side to side to remove it.
- After 15 minutes, when the mass hardens (after 12-24 hours), remove it from the mold.
These ideas allow you to create elegant and practical decorative items for your garden that will give it a unique character and style.
From bottles
Plastic bottles are a great material for children’s creativity, but they can also be used in the garden to create practical and interesting things, such as:
- Vertical gardening : Plastic bottles can become the basis for a vertical garden. They can be used to grow field grasses, sweet herbaceous plants or even vegetables.
- Bird feeders : It’s important to support birds in your garden, especially during the winter when it’s hard for them to find food. By creating feeders from plastic bottles, you help your feathered friends survive and leave them in the spring and summer when they will thank you by catching pests.
- Irrigation systems : Plastic bottles can be used to create an effective drip irrigation system. You will be able to maintain the optimal level of humidity for your garden without the need for complex irrigation technologies.
- Vases for flowers : You can easily create bright and original vases for your flowers from plastic bottles. This is a simple and environmentally friendly way to decorate your garden.
- Wall mosaic : Using colorful plastic bottle caps, you can create original wall mosaics or decorative compositions in your area.
- Fences for the flower garden : Plastic bottles can be used to create a fence around the flower garden. They will add an interesting accent to your garden and separate different plants.
We create drip irrigation from bottles :
- We make holes in the lower part of the bottle and dig it into the ground. The speed of irrigation will depend on the diameter of these holes.
- Place the second bottle at a distance of about 1 meter from the first.
- Fill the bottles with water.

We create a bird feeder :
- We select a plastic bottle and make small holes on the sides. The diameter of the holes should be about 0.4-0.5 cm so that the birds can get the grain.
- Below the feed holes, we make others to insert several pencils that will serve as poles for feathered guests.
- We fix the bottle on the wire.
- Pour the seeds and place the feeder in the garden.
These simple and environmentally friendly ideas will allow you to turn plastic bottles into useful and interesting things in your garden.
Artificial pond and fountains
It is easy to turn an old bathtub into a beautiful pond. The main disadvantage of old baths is that they do not retain heat well, so summer residents often replace them with more modern models. But an old bathtub can be an ideal solution for creating a pond for fish.
Importantly! For concrete preparation, use only fresh cement and clean sand. Otherwise, the finished product may begin to crack.

Step-by-step instructions for creating a decorative bath pond:
- You will need to purchase a pump and filter that correspond to the volume of the bath. This entire volume must be processed by the pump within 1 hour.
- A small filter may be provided in the design. It will need to be cleaned daily. The pump must be connected to the mains. Therefore, if there is no outlet at the place of installation of the bathtub, it is better to contact a professional electrician.
- After collecting the equipment, start by starting the pond.
- Clean the bathtub and, if necessary, paint it.
- Close the bottom drain.
- Before buying plants, make sure that the water has the correct chemical composition. You can learn more about it on our website.
- Start the pump by following the start-up instructions.
- After preparing the water, buy plants. All aquatic plants grow at a certain depth. To adjust the depth of immersion, use a brick.
- The bottom of the mini-pond can be decorated with large pebbles and a layer of coarse sand. If there will be fish in the pond, then choose plants and the type of bottom cover according to the type of fish.
- Start the fish no earlier than 4 weeks after the acclimatization of the plants.
Most garden fountains are created according to the principle of a system in which a pump feeds water through a hose into a decorative container, and from there it falls into a reservoir, where the pump is located. Using an old jug and basin, you can easily create such a system. They can be used to decorate a flower bed or added as decorative accents in your yard.
Garden furniture
You can make stylish and practical garden furniture from improvised materials. Various materials are suitable for this, such as:
- Old pallets.
- Concrete.
- Wood.
- Log or stump.
By adding a bench around a large tree, you will create a cozy place for rest and conversation. You can sit under a tree, enjoying the fresh air, evening conversations or a cup of tea. This bench can also be a great addition to your garden, allowing children to enjoy a variety of children’s games.
Step-by-step instructions for making a bench:
- Draw a drawing of the bench. In order for the bench to cover the tree, it must have the shape of a hexagon. Each section of the bench consists of three boards, and all sections form three nested hexagons.
- Calculate the required dimensions for each section of the bench. Cut the boards into appropriate pieces according to size.
- Divide the bars into 12 legs.
- Assemble the bench seat.
- The legs of each section consist of two bars and a crossbar, which is fixed in the upper part. The seat is attached to this crossbar with screws.
- Now place the sections around the tree and secure them, creating a comfortable and cozy bench for your garden.

Other elements of landscape design
Tin cans can often be found in cottages, which can also be used to decorate your garden. Take three tin cans of different sizes so that they can be placed on top of each other, providing free space on the sides. In this multi-level flower garden, you can plant curly plants, creating an impressive design. Designers recommend choosing plants with the following characteristics:
- Something bright that attracts attention.
- Something curly that will fall from the upper tier.
- Something that has deep green shades.
You can also create a vertical flower garden from an old dresser by planting plants in its boxes. If you do not want to fill the chest of drawers with soil, then place flowers in pots in the boxes.
You can also turn an old pot into a small vase and decorate it with cement stucco. This will allow you to change the appearance of the product, leaving its volume unchanged.
It is always nice to decorate your garden. Therefore, do not rush to throw away old items. Inspired by ready-made ideas, get creative and create something unique.